Wednesday, March 23, 2011

Otto Sew-Along


I have been wanting to sew a pattern from an Ottobre magazine but have been to intimidated by the patterns and the lack of pictures and directions.  When I saw Sugar Cubes and Spice Cake was doing a sew along with a one of the pattern I decided it was time to buy one of the magazine.  The pattern is called "Vaahtokarkki" gingham blouse 1/2010.  It is super cute and I had never done a button down shirt with a collar before but have been wanting to.   Sandra from Sugar Cubes lengthened the shirt and made a dress, I did a bad job cutting mine out and ended up with not enough fabric to make it a dress.  I will have to make my next one a dress.  I used pearl snaps instead of button to give it a little bit of a western look.


My daughter loves her pink cowgirl boots but she did not really have an outfit to go with them, that does not stop her from wearing them with everything.  I also mad her a denim skirt to complete the outfit.  The skirt is just a simple drop waist skirt with a full gather panel attached.  I added a decorative scroll stitch at the hem.


I love this shirt and will be making another very soon.  I have plans to make a couple of the other patterns in the magazine for my daughter and son.  Thank you Sandra for the great sew along and for introducing me to the Ottobre designs.
Posted by Picasa

Birthday Mermaid Outfit

When B wanted a mermaid Birthday party I knew exactly what material I wanted to buy.  I have been wanting to buy the mermaid fabric by Michael Miller for a while now and I wanted to try out the ruffle fabric that I have been seeing recently in the blogging world.  I found this fabric at Print Knit Studios  it is only $5.50 a yard.  She only has a few colors, and luckily one that matched my mermaid fabric, but the saving are worth it compared to the $14 and up stuff. 


This cake is the reason she wanted a mermaid party in the first place.  She wanted a barbie wrapped in a fruit roll up to create the mermaid tail.

I made the skirt using Dana's circle Skirt tutorial at Dana Made It here, one of my favorite blogs.  She has great directions and my pattern came out great and the skirt was supper easy to make.  Because I used the ruffle material and it is directional I had to cut two half donuts and sew the side seams, otherwise the ruffles would have been upside down and the shear portions would not have been covered by the ruffle.  The skirt did not need to be hemmed.  Next time I would have cut it about two inches longer to give room to remove the ruffle lines that got cut part way.  I lost about an inch and a half when I had to trim the bottom ruffle to even it all out.


For the mermaid shirt I used a basic peasant pattern and added a ribbon across the front and then sewed ribbons in the seams for a tie.  I also added a ruffle from the ruffle material at the cuff.  The whole outfit turned out supper cute and my daughter loved it.


Sunday, March 20, 2011

The Blocks Are Done

Block #16 - V and Co.

Fun block I changed up by using different fabric for each pinwheel.

Block Extra #4

This ones is based on block #4.  I used some scraps and turned the half triangle cut offs into pinwheels and trimmed down to 2.5  I really love how this one came out.
Block #2 Revised
 
I thought that this block needed a little something.  So I ripped out the two white squares in between the dark grey ones and added the cute little Gnomes.  Very happy with it now.

Yeah!  All the blocks together.  I added a light aqua boarder around each block when I created the collage.  This is what I'm thinking of doing for the sashing.  I'm still trying to decide on the outside boarder and binding.  The backing will be a red polka-dot pieced with scraps from the front.  I'm so excited to get it all together.  My favorite part is pulling it out of the drier all warm and crinkly and wrapping it around myself.  So close.
Posted by Picasa

Tuesday, March 15, 2011

Mermaid Softies

My daughter just turned 5 and wanted a mermaid birthday party, but not a Little Mermaid party.  There is not much out there except The Little Mermaid when it comes to party stuff, so I had little to work with.  I think it came out so cute and I really liked the originality of it. 
She wanted a bunch of art activities and the 'Build a Mermaid' is one of the activities I came up with.  I started out with the Mermaiden Tutorial from Wee Wonderful and made wraps, gemmed flowers, and necklaces and had a variety of buttons for the girls to choose from.  Because I had to make 9 mermaidens I drew on the faces with fabric pens instead of hand embroidery and I machine sewed the tails together, instead of hand sewing them.  They turned out super cute and even cuter once the girls decorated them. 


Before the girls dressed up the mermaids.  Still super cute with all the frills.  My daughter played with them before the party and wanted me to make more for her to have a school of mermaiden.  But really I was mermaided out.  I had a couple extras so she at least got 3 sisters mermaid
.
They are all ready for the under water ball.

The girls loved dressing up their mermaids and each one unique.  


Happy birthday to my 5 year old baby.
Posted by Picasa

Monday, March 14, 2011

Quilt-Along Blocks #15 & #6 -2

Block #15- Lovely Little Handmades


This block was fun and quick so I had time to do another version of block #6.

Block #6 -2


I really loved my first block #6.  After finishing it I told myself that I has going to make another version of it, and here it is.  Red Riding Hood and the wolf pecking out for the bush is so cute. 
We are almost done with the blocks, one more left on Thursday.  I can not wait to see the finished product.  I still have not figured out if I will be adding sashing and I have not quiet decided on the back fabric or binding.   
Posted by Picasa

Saturday, March 12, 2011

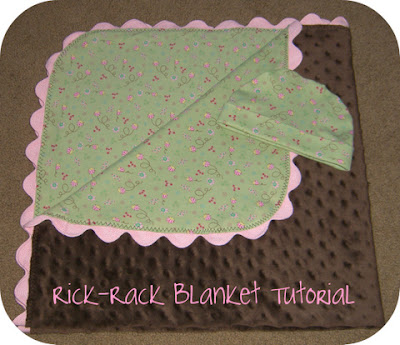
Knit and Minky Rick-Rack Blanket Tutorial


This blanket is so sweet with the pink rick-rack sandwiched between a soft interlock and fuzzy minke.  Just blissful.  I made this one for my cousins baby girl.  I have made knit and minke blankets for my babies and they where always my favorite.  This is the first one that I added the rick-rack and I can't wait to make another one, boy version, for a friend's baby shower at the end of the month.  If you never made a blanket with knit and minke you really should try it out.  Here is a little tutorial. 
Material
1 yard of Interlock
1 yard of Minke
4 yards of Jumbo Rick-Rack
Make sure you wash both of your material in warm water.  I cut 35 x 35 inch square of both materials.   I also like to round off the corners of my baby blankets, especially when using stretchy material.  It will help hide any miss match if the materials stretch while you are sewing a little, I heard a walking foot really helps with this but I don't own one.
Finish one end of your rick-rack, sorry forget to take a picture.

Lay out you interlock face up and start pinning the rick-rack along the edge, starting with the end that you finished.

I used quit a bit of pins especially around the corners.  I would have brought the rick-rack further into the blanket, so that the material stuck out about a 1/4 inch from the rick-rack.  When you get to the starting point leave an extra 5 inches of rick-rack, the blanket will stretch a little as you sew and you don't want to end up short.

 
Attaching the Rick-Rack to the interlock fabric.  Baste the rick-rack to the interlock, starting an inch from the finished end of the rick-rack.  You want to sew just to the right of the middle of the rick-rake (close to the edge of the material), making sure you are sewing on the rick-rack the whole way.  A few inches before you get to the other end line up the rick-rack ends together, cutting any extra, and fold in the unfinished end and finish sewing the rick-rack down.

Now that the rick-rack is sewn down to the interlock, lay it down right sides together with the minke and pin together, again I went heavy on the pinning.

 
Leave a space open for turning right side out.  Sew together, just left, no more then 1/8 inch, of the basting stitches. 


Turn right side out and iron edges and pinning opening closed.  Top stich close to the edge.  I used a stretch zigzag stitch.  It doesn't have to be a stretch stitch, I just like the look of this particular one.


You should have some extra interlock left to make a baby hat if you want. I used Make It and Love It tutorial  Baby Hat.

Friday, March 11, 2011

Sew-Along Block Extra #2

Extra Block #2
Sit Here and You Could Win This Fish.
A combination of block #5, #9, and #12.

Curvy Clutches

Well I finally finished the three curvy clutches from Keyka's Lou pattern.  I had ran out of magnetic closures and had to order more.  I received them about a month ago but just never got around to finishing them off, too busy with the sew along and B's birthday.  So here they are.  They are so cute.  One for my sister, her birthday was last week, one for a friend in a make-it-Pay-it-Forward. 


I will be making two more of these little sweet coin purse frames to match the other clutches, soon.

Thursday, March 10, 2011

Quilt -Along Block # 14

Block # 14- I'm Just a Guy Who Quilts
Follow the Leader
I'm getting so fast, cutting and sewing it.  It probably takes me half the time to finish a block now then it did a couple of weeks ago.  Love it.  I'm in the process of making B a dress out of the pink tree fabric.  I'll post when I'm finished.  I will post B's mermaid birthday dress tomorrow.

Wednesday, March 9, 2011

Quilt -Along Block # 13

Block #13- Camp Follower bags and Quilts

I made a few changes in this block, both in the design and colors.  I left out the tiny boarder around the nine patch and increases my squares to 2 inches and then trimmed down the nine patch.  The boarder would have only been 1/8 inch and I know I would have had a hard time getting it even.   I ran out of the light aqua so I used the white script in it's place.  This was a pretty easy block and I'm definitely getting better at piecing and lining up my edges. 

Blocks 1-13 with extra 1 Collage

So fun, I can not wait to see the quilt all together.

Monday, March 7, 2011

Quilt -Along Block # 11 & 12

Block #11- Fat Quarterly
This block was not named so I named it Walking With Elephants.  When I went to trim the four corner blocks I trimmed them at the 90 degree angle around the white half triangles.  I should have trimmed them evenly around all four sides, I don't know what I was thinking.  So all four white triangles are short, but I still really liked the way it turned out. 

Block #12- Sugar Stitches

This block was not named either so I will name this one Mermaiden Shells.  I love how this one turned out.  Partly because I love Heather Ross's Underwater Friends mermaids.  I have had this fabric for a couple years and have now just cut into it.  I'm so glad I did and hope to use more of it soon.  Also all of my blocks lined up and all of my geese have their noses.